Levridge Commodity Accounting Intracompany and Intercompany Contracting
| Published: Jan 6, 2025 | Accounting , Grain , Product Updates , Release Notes | read
 read
readIn some organizations there is a more formal process to buy and sell to another part of the organization. This could be within the same legal entity or across legal entities. An example of intracompany contracting could be Marketers setup as sites/branches and they buy and sell between themselves which enables each marketer to have their own P&L and long/short reporting. An example of intercompany contracting would be one legal entity purchases from another legal entity.
This document will walk through how to setup and the processing for both intracompany and intercompany contracts.
Intracompany Contracts
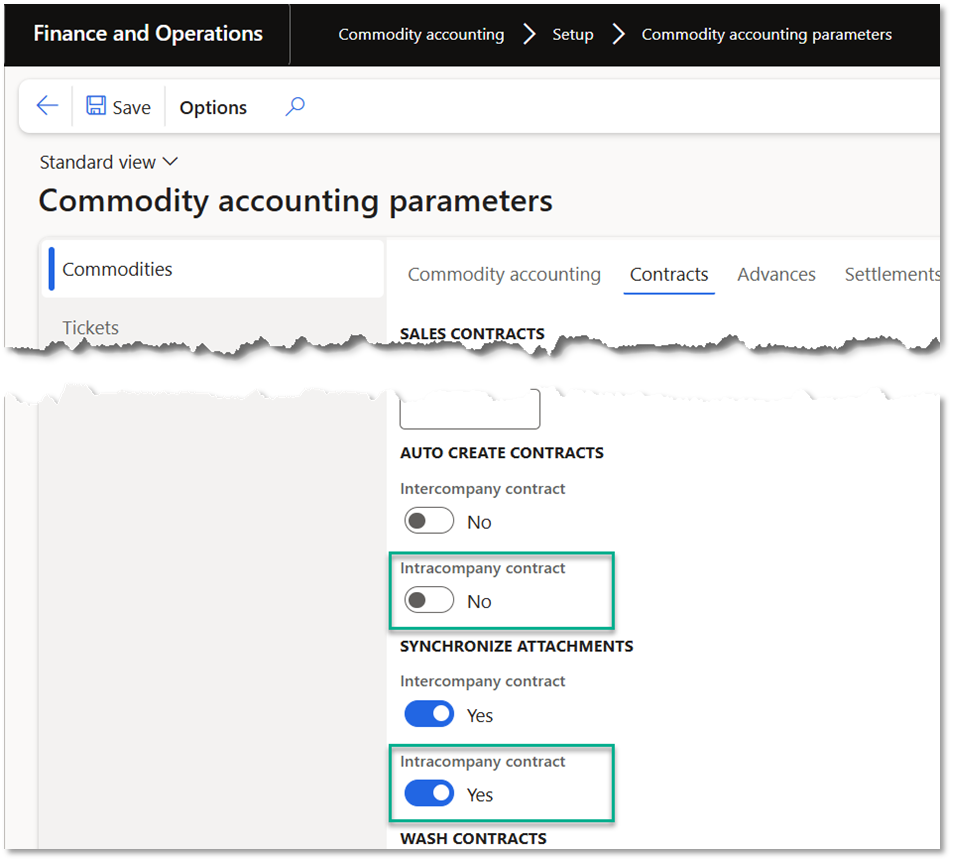
Parameter Options: There are not specific parameters that require enabling for the feature; however, there are a few options available. If you go to Commodity accounting > Setup > Commodity accounting parameters > Commodities > Contracts, there are two options for intracompany (shown in the snapshot below): Auto create Intracompany contract and Synchronize attachments for Intracompany contract.
If Auto create Intracompany contract is set to No, a user must initiate the creation of the corresponding intracompany contract by clicking a button. This enables the user to work on the contract getting all of the information in the contract before the other contract is created. Once the corresponding contract is created, the system does not keep the contracts in synch. If this option is set to Yes, when the contract is created the corresponding contract will be created when the user moves away from the contract form. For example, you create a sales contract and when you leave that contract form and move to a different contract or navigate to another form in the system, the corresponding contract will automatically be created.
If Synchronize attachments for Intracompany contract is set to No, any attachments that are saved for one contract will not be copied to the other corresponding contract. If set to Yes, any attachments applied to one contract will automatically be copied to the other. The system will keep the attachments in synch even after the creation of the corresponding contract.
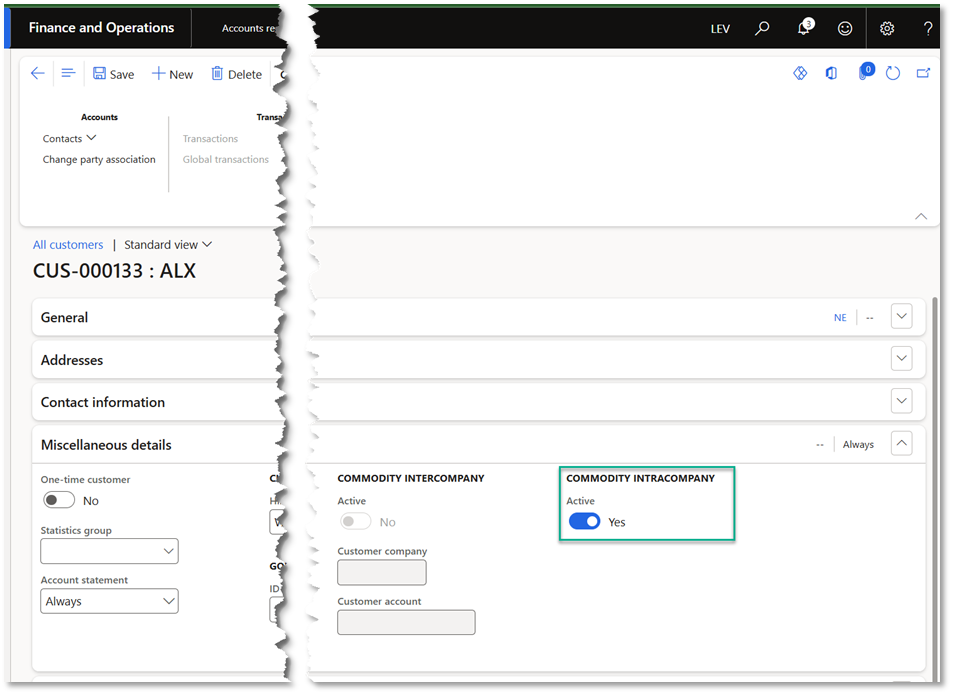
Enabling Intracompany on Customer Accounts: Enabling intracompany is relatively simple process. Go to Accounts receivable > Customers > All customers or Ag sales > Customers > All customers. Remember intracompany contracts are buying and selling within a legal entity, so you would need to have customer accounts setup for your various sites or branches. In these examples, I have ‘ALX’, ‘ BAR’, ‘WHP’ and ‘ART’ which are sites in my legal entity. If you open one of the customer accounts for your site, in the customer detail form in the Miscellaneous details fast tab, set Commodity intracompany Active = Yes as shown in the snapshot below. You would want to do that for all of your site customer accounts.
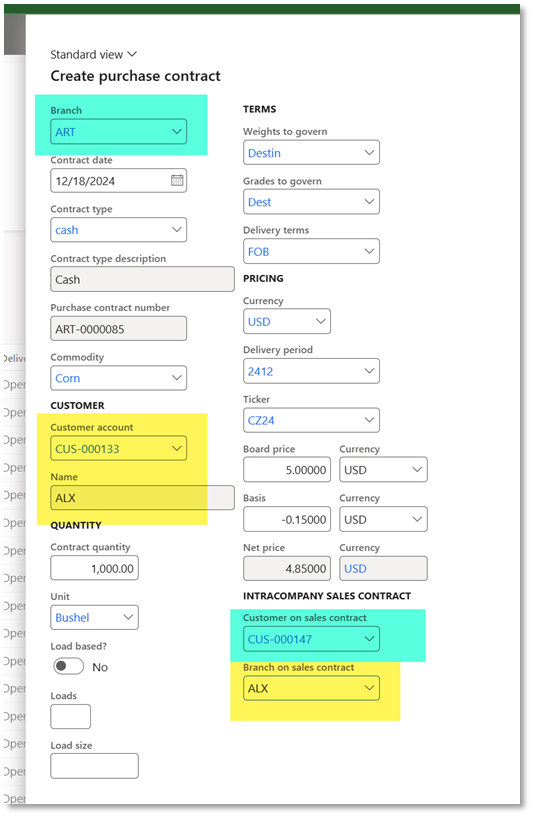
Intracompany on Commodity Sales and Purchase Contracts: Once your customer accounts are enabled for intracompany, when you create a commodity sales contract or purchase contract for that customer account you will have the option to identify it as an intracompany contract. Let’s first take a look at the purchase contract flow. If you were to do the process without the intracompany feature you would have to create the purchase contract and the sales contract manually. For example, if site ‘ART’ was purchasing from ‘ALX’ you would create a purchase contract for branch ‘ART’ and the customer account would be ‘ALX’. Then create a sales contract for branch ‘ALX’ and the customer on the sales contract would be ‘ART’.
With intracompany contracts only one side is needed to be created and the system will create the other. Go to Commodity accounting > Inbound > Contract > Purchase contract. Click New to create a new purchase contract. For my example, I want ‘ART’ to purchase from ‘ALX’. So on the create purchase contract dialog, select ‘ART’ as the branch, and the customer account is ‘ALX’. As soon as you select the customer account that is enabled for Intracompany, 2 additional fields will display below the pricing group ‘Customer on sales contract’ and ‘Branch on sales contract’. The customer you want to select is the ‘ART’ customer account since ‘ALX’ is selling to ‘ART’.
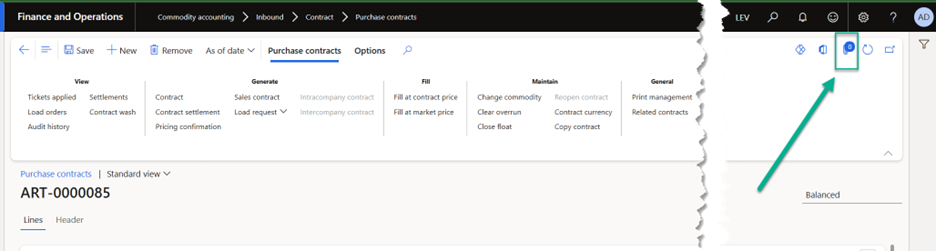
After you click Create on the Create purchase contract dialog, you finish entering all of the information on the purchase contract detail form. Depending on your parameter setting for Auto create for intracompany contracts, if that is set to No, the user has to click the ‘Intracompany contract’ in the Generate group of the Purchase contract action pane (seen snapshot below). If the auto create option is set to Yes, the system will create the intracompany sales contract when the user selects a different purchase contract or leaves this form.
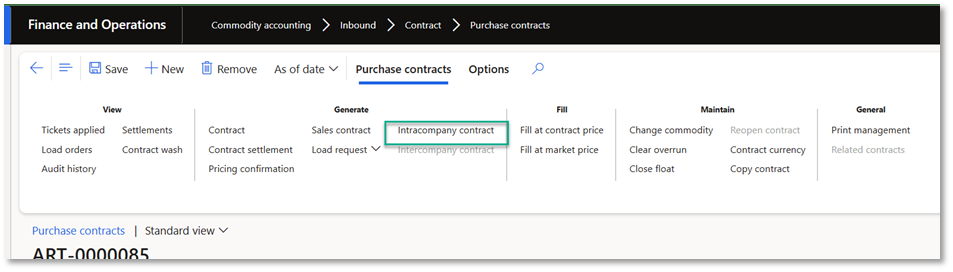
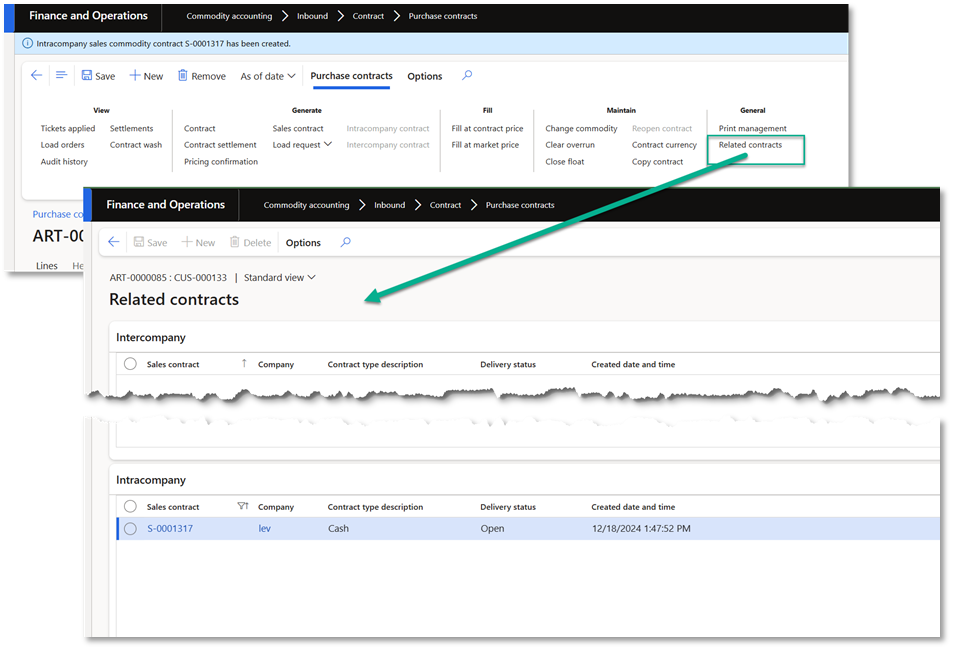
After the intracompany sales contract is created, you can see the related contract if you click on the ‘Related contracts’ option in the General group of the Purchase contract action pane (see snapshot below).
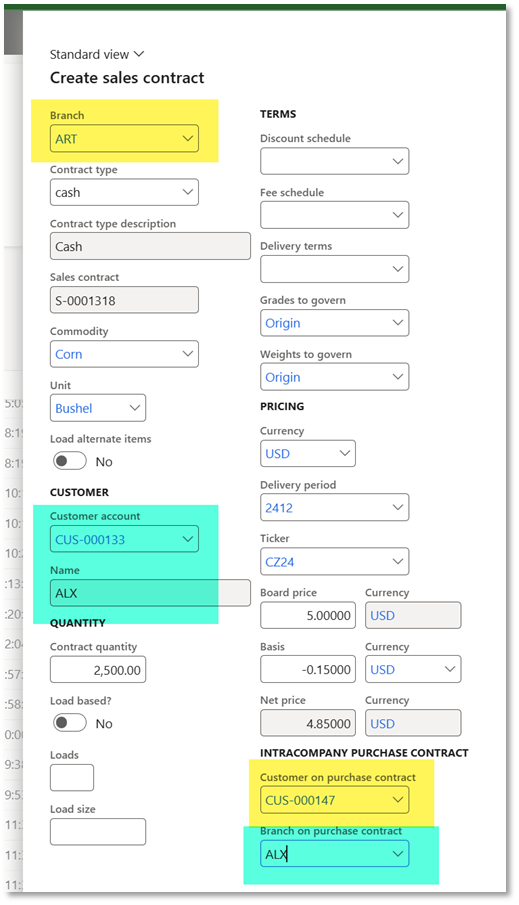
If the first contract that is created is the sales contract, similar steps as the purchase contract, but in the Create sales contract dialog you get different options: ‘Customer on purchase contract’ and ‘Branch on purchase contract’.
Attachments on intracompany contracts: If you add attachments to a purchase contract (or sales contract) and it is an intracompany contract, depending on the parameter Synchronize attachments for Intracompany contracts. If it is set to Yes, the attachment will be copied over to the sales contract and they will be kept in synch always. If that option is set to No, the attachment will only be accessible from the contract that it was saved to.

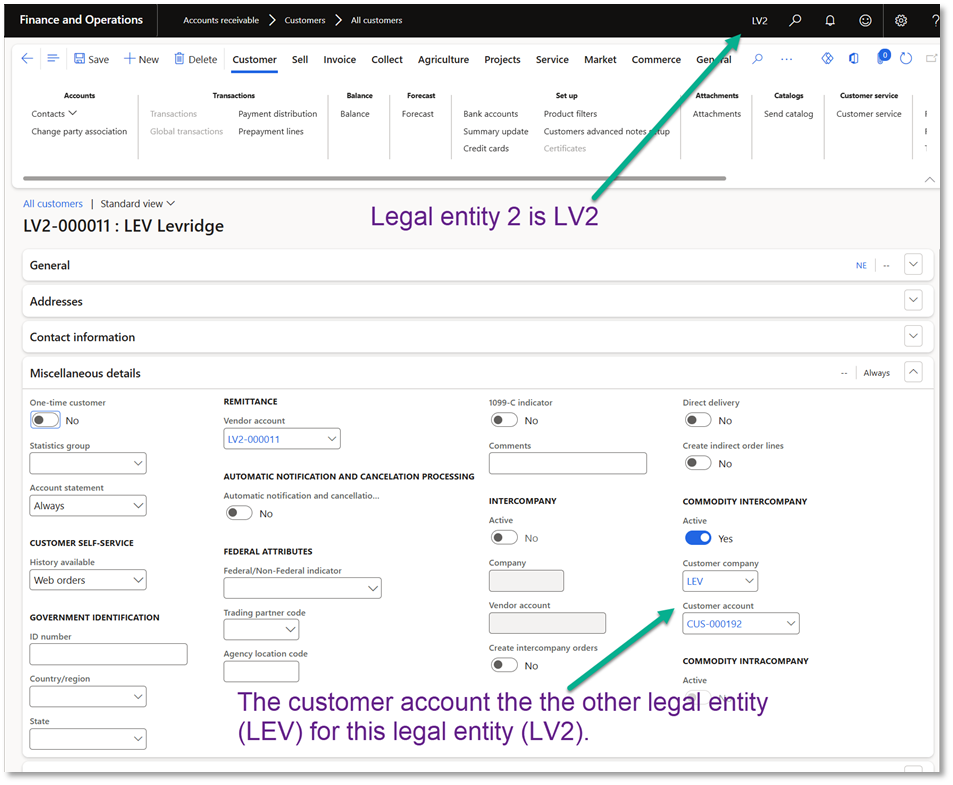
Enabling Intercompany on Customer Accounts: Enabling intercompany on a customer account has a few more steps and options. Go to Accounts receivable > Customers > All customers or Ag sales > Customers > All customers. Remember intercompany contracts are buying and selling between two legal entities, so in legal entity 1 you would need to have customer accounts setup for legal entity 2, and in legal entity 2 have a customer account setup for legal entity 1.
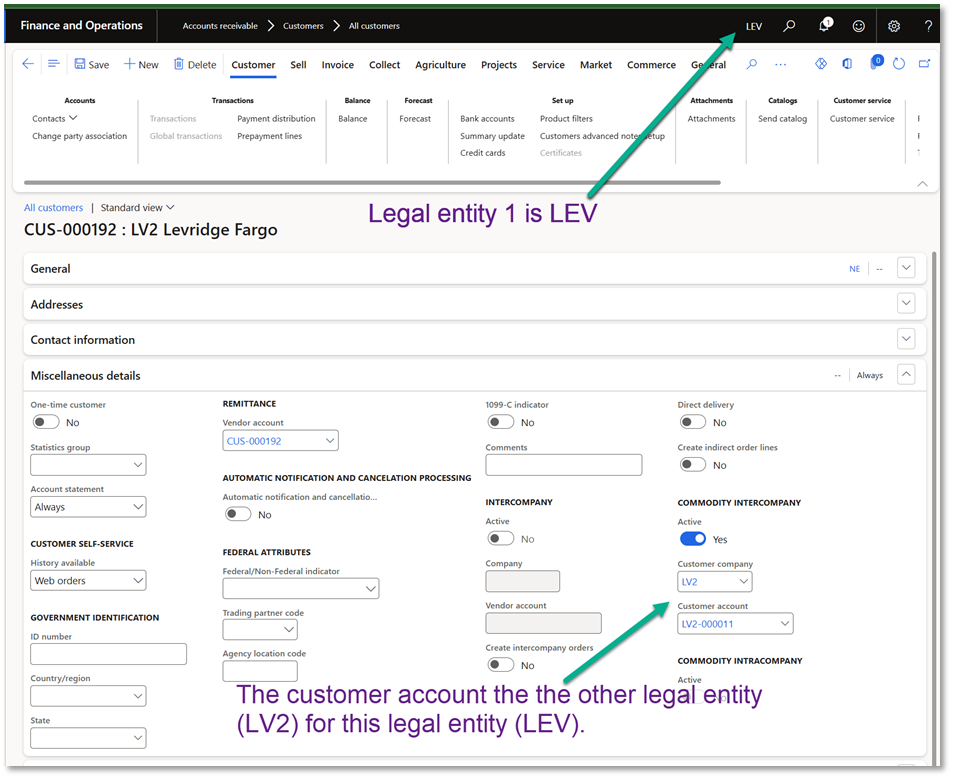
In these examples, I have ‘LEV’ as my first legal entity, and it is buying commodities from legal entity ‘LV2’. In ‘LEV’ if you open the customer account for ‘LV2’, in the customer detail form in the Miscellaneous details fast tab, set Commodity intercompany Active = Yes, select the other legal entity that it is related to ‘LV2’, and the customer account in that legal entity for your current legal entity, in this case the customer account for ‘LEV’. See snapshots below. This allows the system to know what is the linked legal entity and what is the account in that legal entity that this customer is linked to.
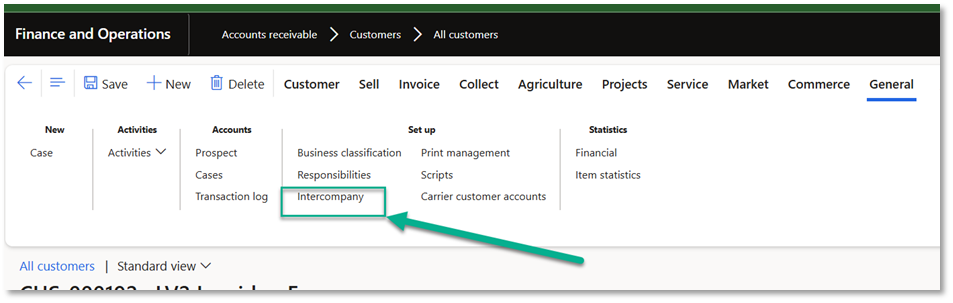
Once the customer account is enabled for commodity intercompany, you can define what and how it is sent to the other legal entity. Click ‘Intercompany’ in the Set up group on the General action pane on the customer account form.
There are two Levridge options that are available ‘Purchase contract value mapping’ and ‘Sales contract value mapping’. If you click on the ‘Purchase contract value mapping’ tab, here is where you can define what and how values are sent to the sales contract in the other legal entity.
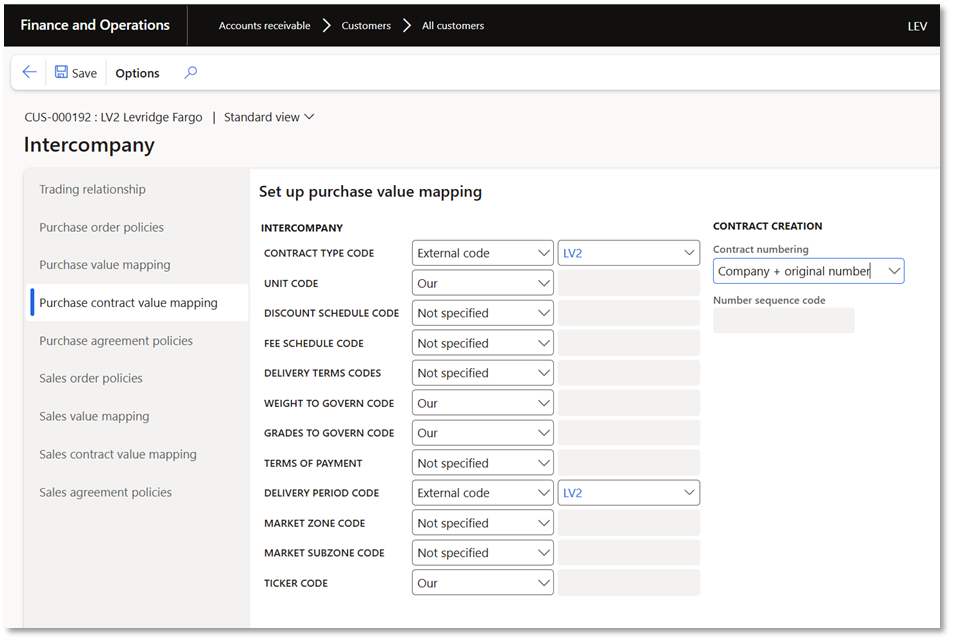
Contract numbering: Do you want it to use a specific number sequence, the original value of the purchase contract, or concatenate the company with the original number.
Mapping options:
Not specified – this means the value in the field will not update the corresponding sales contract.
Our – this means the value from the originating purchase contract will flow to the corresponding sales contract.
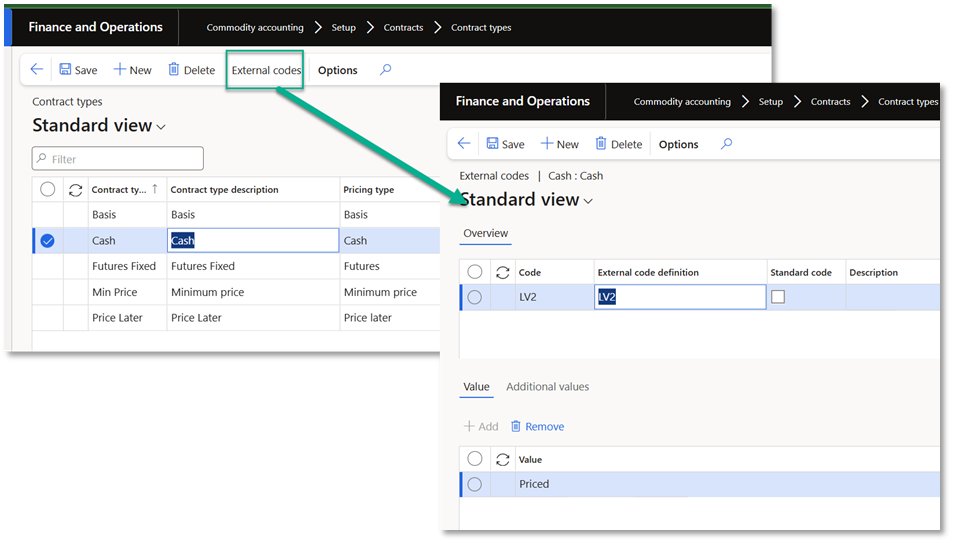
External code – this means the value that updates the corresponding sales contract will be determined by the external code value defined in the second code field. This allows for translation of a value from one company to another. For example, if the contract type code in legal entity 1 is ‘Cash’ but the corresponding value in legal entity 2 is ‘Priced’, the external code would be the place that is defined.
Note: Be aware that if you have to translate one value, you have to translate them all for that entity. For example, if it was only ‘Cash’ that needed to be translated to ‘Priced’, but you still had other contract types like ‘Basis’ and ‘Futures’, those would have to be defined with external codes as well.
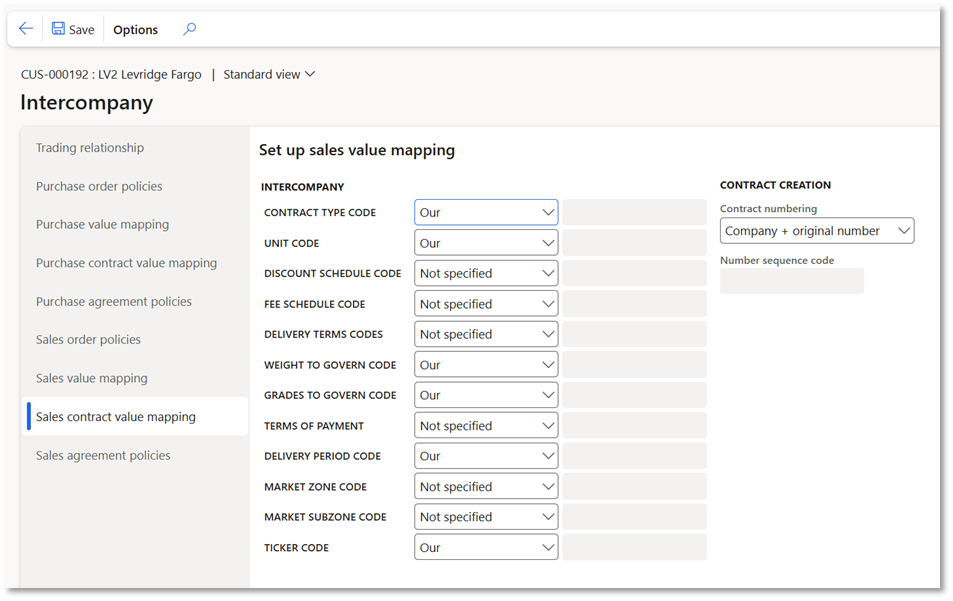
If you click on ‘Sales contract value mapping’ there are similar options to the purchase tab.
If you need to use the external codes for translating one value to another, if you go to the detail form for entity there will be an ‘External codes’ menu item on the form. For example, let’s look at the contract type codes from the purchase contract value mapping. Select the contract type, and click External codes. On the External codes form, click New on the top and enter the code in the first grid. And then click Add on the bottom grid and enter the value that it should be translated to. In this case we are translating ‘Cash’ to ‘Priced’ (see snapshot below).
******************
Intercompany on Commodity Sales and Purchase Contracts
Once your customer accounts are enabled for intercompany, when you create a commodity sales contract or purchase contract for that customer account you will have the option to identify it as an intercompany contract. Let’s first take a look at the purchase contract flow without the intercompany feature. You would have to create the purchase contract in company 1 and the sales contract in company 2 both manually. For example, if legal entity ‘LV2’ was purchasing from ‘LEV’ you would create a sales contract in legal entity ‘LEV’ for customer account would be ‘LV2 company’. Then create a purchase contract in legal entity ‘LV2’ for customer ‘LEV’
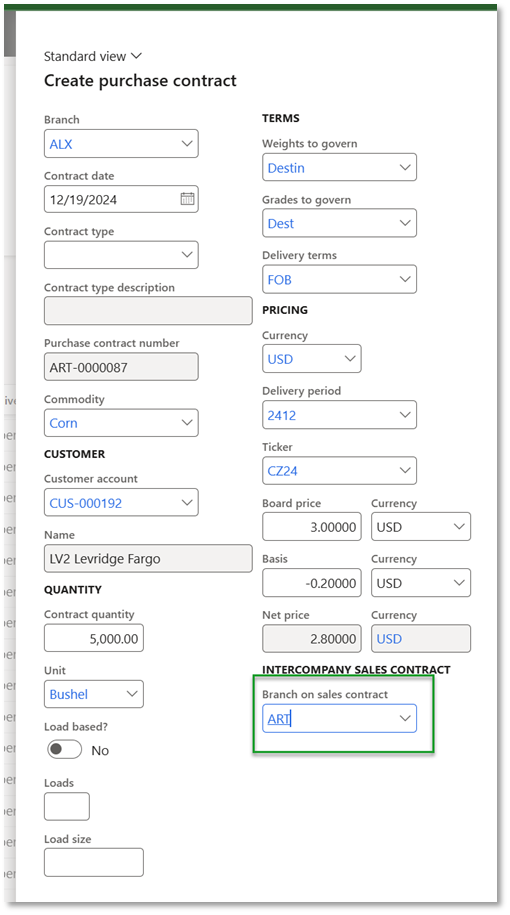
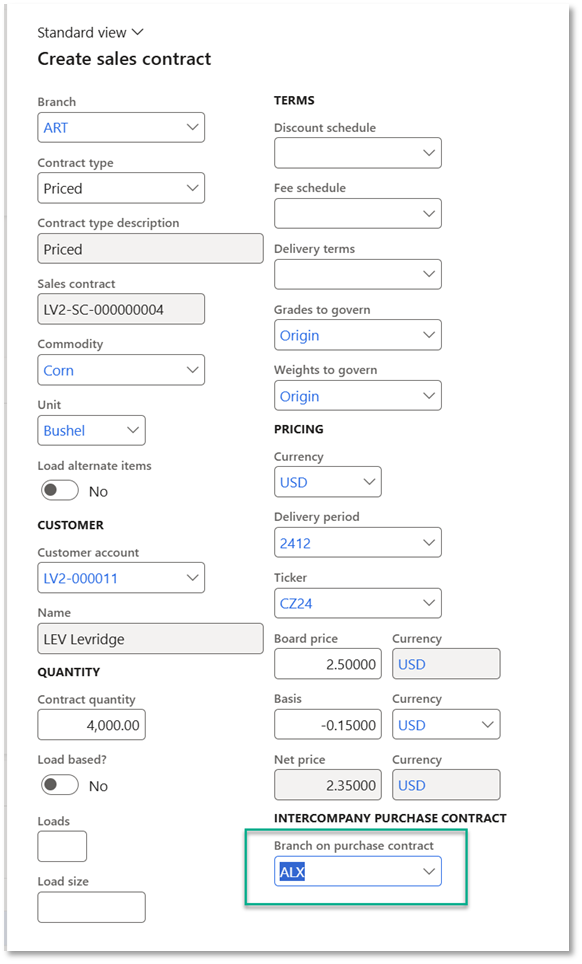
With intercompany contracts only one side is needed to be created and the system will create the other. Go to Commodity accounting > Inbound > Contract > Purchase contract. Click New to create a new purchase contract. For my example, I want ‘LV2’ legal entity to purchase from ‘LEV’ legal entity. On the create purchase contract dialog in legal entity ‘LEV’, select ‘LV2 company’ as the customer account. As soon as you select the customer account that is enabled for Intercompany, a new field ‘Branch on sales contract’ displays. You would select the branch that should be on the sales contract when created.
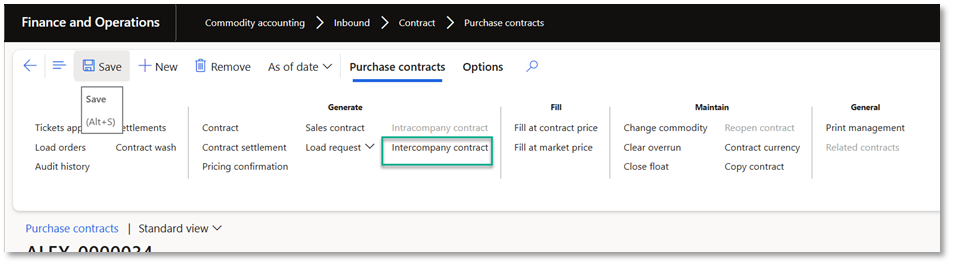
After you click Create on the Create purchase contract dialog, you finish entering all of the information on the purchase contract detail form. Depending on your parameter setting for Auto create for intercompany contracts, if that is set to No, the user has to click the ‘Intercompany contract’ in the Generate group of the Purchase contract action pane (seen snapshot below). If the auto create option is set to Yes, the system will create the intercompany sales contract when the user selects a different purchase contract or leaves this form.
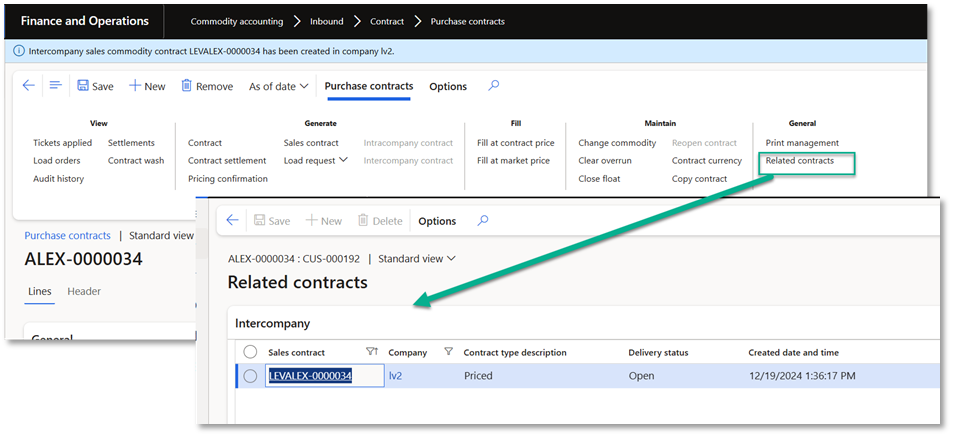
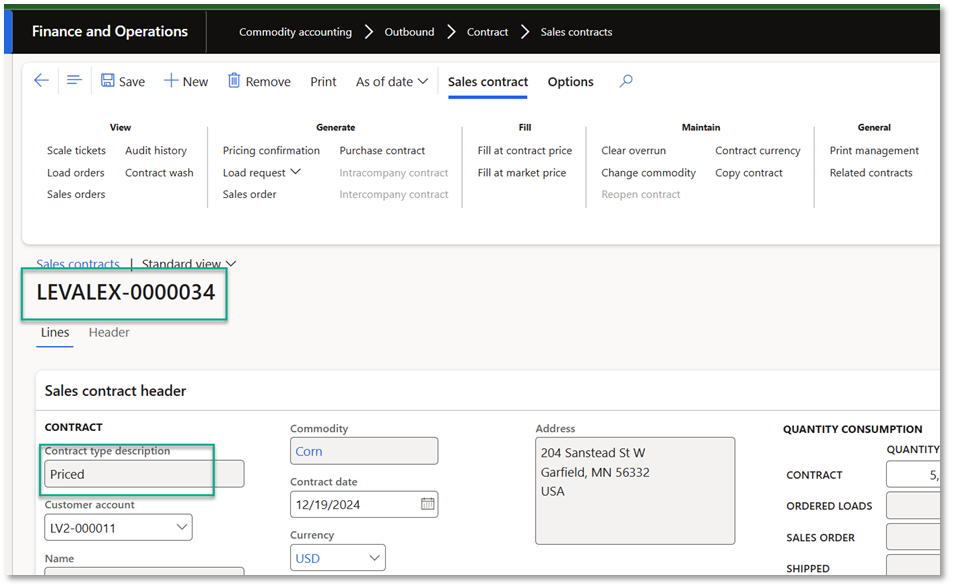
After the intercompany sales contract is created, you can see the related contract if you click on the ‘Related contracts’ option in the General group of the Purchase contract action pane (see snapshot below).
Now if you switch legal entities and open the sales contract that was created. You can see the contract number was set to LEVx as it came from LEV and brought with it the original contract number. As well, the sales contract type in this other company is using the translated value from the contract type record.
If the first contract that is created is the sales contract, similar steps as the purchase contract, but in the Create sales contract dialog you get ‘Branch on purchase contract’.
Attachments on intercompany contracts
If you add attachments to a purchase contract (or sales contract) and it is an intercompany contract, depending on the parameter Synchronize attachments for Intercompany contracts. If it is set to Yes, the attachment will be copied over to the sales contract and they will be kept in synch always. If that option is set to No, the attachment will only be accessible from the contract that it was saved to.