Implementing Print Management for Custom Module
| Updated: Oct 12, 2023 | Accounting | read
 read
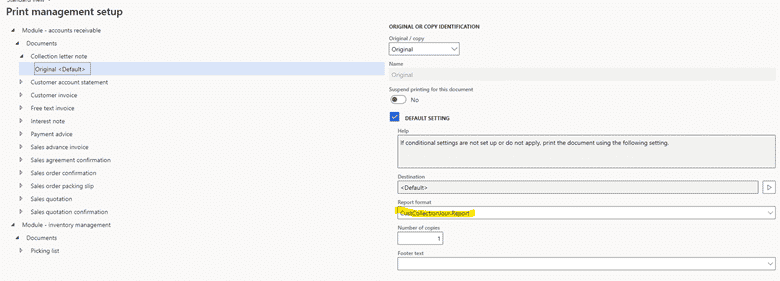
readAt Levridge, as an ISV, we have our own custom modules with custom reports. Stock D365 Finance and Operations modules like Accounts Receivable, Accounts Payable, and a few others have Print Management Settings. These are settings that apply to those defined reports when they are printed – like emailing a copy of the Free Text Invoice to an account every time an invoice is printed. These settings are hierarchical in nature and are defined at the module level, account level, and/or transactional level. This hierarchy allows for adding more specific rules such as emailing free text invoices for Customer A to Manager B, and Customer B to Manager A. In this blog, I will talk about implementing print management for a custom module at the module level.
Before you begin, refer to the white paper in resource 1 and read it over a few times. This is your guide on what to do, and the other links offer extra guidance and examples. The white paper also frequently instructs you to look at base code for examples, and I will do the same. A search of “PrintMgmt” in the AOT is a good place to start looking, and a look at the report controllers for the reports that use print management will be a guide for what your report controllers need to look like.
To start off:
- 1. Extend PrintMgmtDocumentType enum in your module
- a. Add a new element with a relevant name for your report
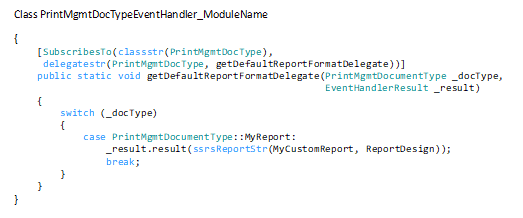
- 2. Create a class to handle events from PrintMgmtDocType
- 3. Create PrintMgmtNode class in your module following naming pattern (PrintMgmtNode_ModuleName)
- a. For this, it is easiest to look at a preexisting node in the AOT. Open PrintMgmtNode_Purch class, your class needs to do the same. Extends PrintMgmtNode, which will require you to implement 5 methods: getDisplayCaptionImplementation, getDocumentTypes, getIconImageResNum, getNodeType, getReferencedTableId. There is helpful xml documentation provided for each method.
- 4. Extend PrintMgmtNodeType in your module and add an element for it.
- 5. Create PrintMgmtHierarchy class in your module following same naming pattern as with nodes.
- a. Again, this is easiest to look at the preexisting examples. Your class will extend PrintMgmtHierarchy and implement getNodesImplemenation and getParentImplementation methods. View PrintMgmtHierarchy_Purch.
- b. Nodes are the level of defaulting I described in the introduction and the hierarchy is a group of related nodes
- 6. Extend PrintMgmtHierarchyType in your module and add an element for it.
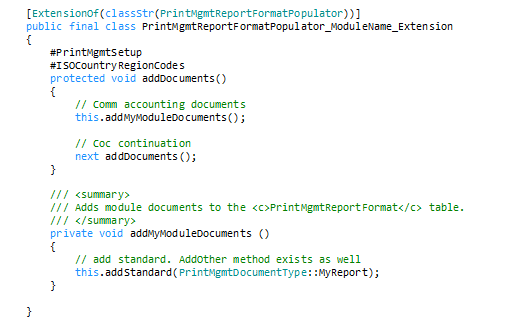
- 7. Create an extension class for PrintMgmtReportFormatPopulator. This will ensure that your reports show up in the format setting
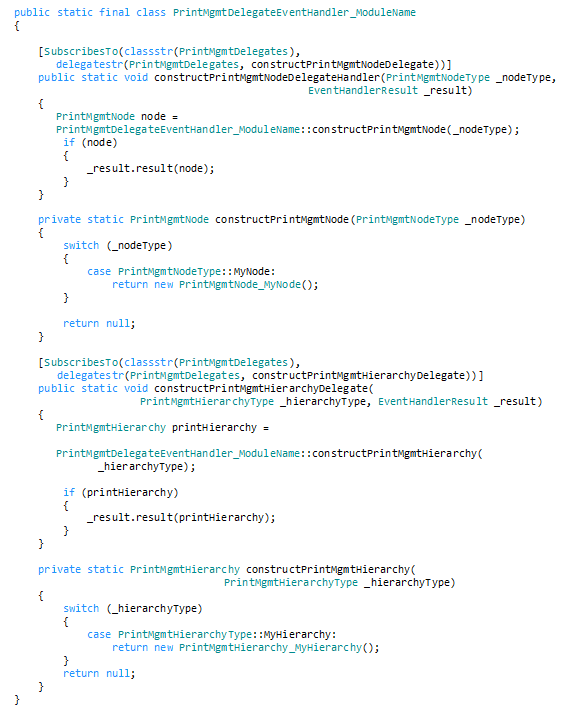
- 8. Lastly, you will need to create a class to subscribe to print management delegate events that will construct print management node and hierarchy. Again, there are examples in the AOT.
Now you have the framework set up to run the reports with print management, next you need to set the report up to use those settings. Your report controller class (if it doesn’t exist, then you need to create one, probably along with a Data Contract and Data Provider class) needs to extends SrsPrintMgmtController (NOT SrsReportRunController, the printmgmt one extends the reportrun controller). You will need to implement the runPrintMgmt method and initPrintMgmtReportRun. See how the FormLetterReport class implements these things for good guidance, similar to resource #5.
Additional resources:
1. AX 2012 Print Management Integration Guide White Paper
2. Helpful forum for adding new documents
3. Understanding of Event and Delegates
4. Print Management Checkbox for optional use of print management settings
5. Form letter report style implementation